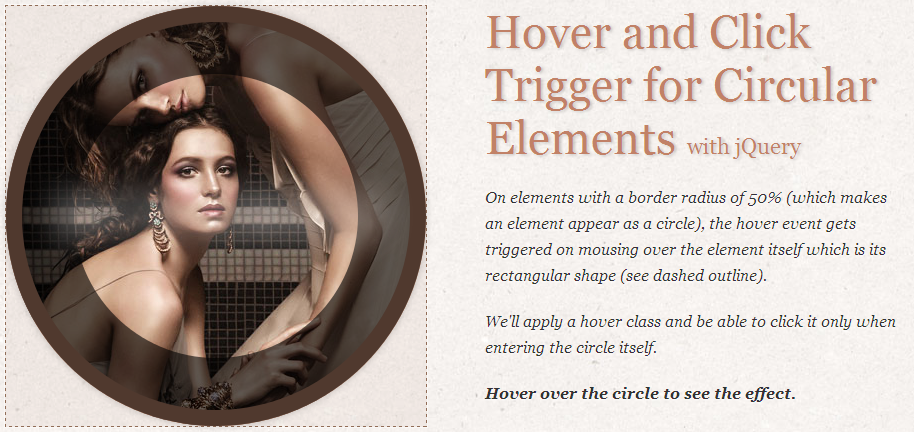
在我们的示例中,我们将创建一个圆与某种特效。结构只会是:<a href="#" id="circle" class="ec-circle"> <h3>Hovered</h3> </a>样式将如下:.ec-circle{ width: 420px; height: 420px; -webkit-border-radius: 210px; -moz-border-radius: 210px; border-radius: 50%; text-align: center; overflow: hidden; font-family:'Kelly Slab', Georgia, serif; background: #dda994 url(../images/1.jpg) no-repeat center center; box-shadow: inset 0 0 1px 230px rgba(0,0,0,0.6), inset 0 0 0 7px #d5ad94; transition: box-shadow 400ms ease-in-out; display: block; outline: none; }现在,我们将定义一个类悬浮效果而不是动态伪类:hover。这个想法是为了应用这门课然后jQuery当我们进入循环的元素:.ec-circle-hover{ box-shadow: inset 0 0 0 0 rgba(0,0,0,0.6), inset 0 0 0 20px #c18167, 0 0 10px rgba(0,0,0,0.3); }只有当我们有禁用JavaScript,我们将添加伪类。这种风格可以找到noscript.css:.ec-circle:hover{ box-shadow: inset 0 0 0 0 rgba(0,0,0,0.6), inset 0 0 0 20px #c18167, 0 0 10px rgba(0,0,0,0.3); }JAVASCRIPT 我们将创建一个简单的插件,基本上“重新定义”前面提到的三个事件。我们将只应用于圆形的事件:$.CircleEventManager = function( options, element ) { this.$el = $( element ); this._init( options ); }; $.CircleEventManager.defaults = { onMouseEnter : function() { return false }, onMouseLeave : function() { return false }, onClick : function() { return false } }; $.CircleEventManager.prototype = { _init : function( options ) { this.options = $.extend( true, {}, $.CircleEventManager.defaults, options ); // set the default cursor on the element this.$el.css( 'cursor', 'default' ); this._initEvents(); }, _initEvents : function() { var _self = this; this.$el.on({ 'mouseenter.circlemouse' : function( event ) { var el = $(event.target), circleWidth = el.outerWidth( true ), circleHeight = el.outerHeight( true ), circleLeft = el.offset().left, circleTop = el.offset().top, circlePos = { x : circleLeft + circleWidth / 2, y : circleTop + circleHeight / 2, radius: circleWidth / 2 }; // save cursor type var cursor = 'default'; if( _self.$el.css('cursor') === 'pointer' || _self.$el.is('a') ) cursor = 'pointer'; el.data( 'cursor', cursor ); el.on( 'mousemove.circlemouse', function( event ) { var distance = Math.sqrt( Math.pow( event.pageX - circlePos.x, 2 ) + Math.pow( event.pageY - circlePos.y, 2 ) ); if( !Modernizr.borderradius ) { // inside element / circle el.css( 'cursor', el.data('cursor') ).data( 'inside', true ); _self.options.onMouseEnter( _self.$el ); } else { if( distance <= circlePos.radius && !el.data('inside') ) { // inside element / circle el.css( 'cursor', el.data('cursor') ).data( 'inside', true ); _self.options.onMouseEnter( _self.$el ); } else if( distance > circlePos.radius && el.data('inside') ) { // inside element / outside circle el.css( 'cursor', 'default' ).data( 'inside', false ); _self.options.onMouseLeave( _self.$el ); } } }); }, 'mouseleave.circlemouse' : function( event ) { var el = $(event.target); el.off('mousemove'); if( el.data( 'inside' ) ) { el.data( 'inside', false ); _self.options.onMouseLeave( _self.$el ); } }, 'click.circlemouse' : function( event ) { // allow the click only when inside the circle var el = $(event.target); if( !el.data( 'inside' ) ) return false; else _self.options.onClick( _self.$el ); } }); }, destroy : function() { this.$el.unbind('.circlemouse').removeData('inside').removeData('cursor'); } };当我们用鼠标输入的边界框圈,我们将“mousemove事件绑定到元素,这样我们可以跟踪如果鼠标的距离的中心元素如果超过半径。如果是,我们知道我们还没有徘徊的圆形区域的元素。 一旦鼠标的距离小于半径,我们知道,我们走进圈子,触发自定义“mouseenter”事件。 我们也只允许当鼠标单击事件的内部循环。 在我们的示例中,我们将我们的插件应用于元素。在我们的例子中,我们添加悬浮类“mouseenter”和删除“mouseleave”。$('#circle').circlemouse({ onMouseEnter : function( el ) { el.addClass('ec-circle-hover'); }, onMouseLeave : function( el ) { el.removeClass('ec-circle-hover'); }, onClick : function( el ) { alert('clicked'); } });我希望你觉得这有用!