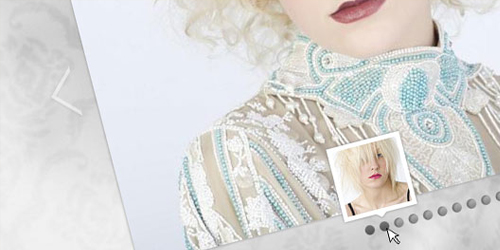
HTML结构将由一个主要集装箱将有大的形象包装图片,导航项和点列表缩略图预览:<div id="ps_container" class="ps_container"> <div class="ps_image_wrapper"> <!-- First initial image --> <img src="images/1.jpg" alt="" /> </div> <!-- Navigation items --> <div class="ps_next"></div> <div class="ps_prev"></div> <!-- Dot list with thumbnail preview --> <ul class="ps_nav"> <li class="selected"> <a href="images/1.jpg" rel="images/thumbs/1.jpg">Image 1</a> </li> <li> <a href="images/2.jpg" rel="images/thumbs/2.jpg">Image 2</a> </li> ... <li class="ps_preview"> <div class="ps_preview_wrapper"> <!-- Thumbnail comes here --> </div> <!-- Little triangle --> <span></span> </li> </ul> </div>缩略图预览元素点列表中的列表项。这将有一个特殊的类,因为我们想把这个元素不同。每个点列表项将包含一个link元素,将缩略图上的信息和大的形象。使用JavaScript,我们将提取路径信息的属性和动态创建的图像元素。 让我们看一看样式 首先,我们将风格的主要容器。因为我们的图片有一个最大宽度680像素和450像素的最大高度,我们将定义以下值的容器(留下一些空间点列表):.ps_container{ display:none; width:680px; height:500px; margin:20px auto 0px auto; position:relative; }现在我们将风格的包装完整的图像。在这里我们设定的最大尺寸和说溢出是隐藏的。我们这样做是因为我们希望能够将两个图像在这个包装器但是切断溢出。在JS功能我们将动画图像,当前被显示。 我们将中心包装器通过设置“auto”:.ps_image_wrapper{ width:680px; height:450px; overflow:hidden; position:relative; margin:0 auto; -moz-box-shadow:0px 0px 5px #999; -webkit-box-shadow:0px 0px 5px #999; box-shadow:0px 0px 5px #999; }image(s)的位置的包装应该绝对因为我们想左值下滑当前动画图片和幻灯片之前:.ps_image_wrapper img{ position:absolute; left:0px; top:0px; }导航元素有以下方式:.ps_prev, .ps_next{ width:30px; height:59px; position:absolute; top:50%; margin-top:-40px; cursor:pointer; opacity:0.5; } .ps_prev{ background:transparent url(../images/prev.png) no-repeat top center; left:-50px; } .ps_next{ background:transparent url(../images/next.png) no-repeat top center; right:-50px; } .ps_prev:hover, .ps_next:hover{ opacity:0.9; }点与类列表“ps_nav”将被放置在完整的形象,由汽车利润中心:ul.ps_nav{ list-style:none; margin:0; padding:0; width:170px; margin:20px auto; position:relative; }点列表元素将浮动:ul.ps_nav li{ float:left; }和内部链接元素会得到点背景图像,这是一个精灵图片:ul.ps_nav li a{ display:block; text-indent:-9000px; width:11px; height:11px; outline:none; padding:0px 3px; background:transparent url(../images/dot.png) no-repeat top center; }在徘徊我们将改变背景位置显示另一半:ul.ps_nav li a:hover,ul.ps_nav li.selected a{ background-position:50% -11px; }我们的特别元素列表,将缩略图预览,将绝对定位。顶部有一个负值,因为我们想要把这个元素,超出了列表。左边的值将被动态地计算。-34.5像素预览是左值元素,当我们想要展示它在第一个点:ul.ps_nav li.ps_preview{ display:none; width:85px; height:91px; top:-95px; left:-34.5px; /*This we will calculate dynamically*/ position:absolute; }跨度将小三角形:ul.ps_nav li.ps_preview span{ background:transparent url(../images/triangle.png) no-repeat top center; width:15px; height:6px; position:absolute; top:85px; left:35px; }预览包装器函数相同的方式就像完整的形象包装。我们将隐藏溢出:.ps_preview_wrapper{ width:75px; height:75px; border:5px solid #fff; overflow:hidden; position:relative; -moz-box-shadow:0px 0px 5px #999; -webkit-box-shadow:0px 0px 5px #999; box-shadow:0px 0px 5px #999; }最终,我们希望缩略图的绝对位置,因为我们想要动画滑动效果:左值.ps_preview_wrapper img{ position:absolute; top:0px; left:0px; }JAVASCRIPT 这个画廊是指小缩略图的想法当悬停在一个点,表示和图像。 当移动光标点,我们想创建一个移动的滑动动画未来目前徘徊缩略图。这将创建一个巨大的影响,给的错觉,我们有一个看不见的酒吧和预览缩略图上面点元素使其可见。 我们也希望点击图像显示了“pushing”当前,从左边var $ps_container = $('#ps_container'), $ps_image_wrapper = $ps_container.find('.ps_image_wrapper'), $ps_next = $ps_container.find('.ps_next'), $ps_prev = $ps_container.find('.ps_prev'), $ps_nav = $ps_container.find('.ps_nav'), $tooltip = $ps_container.find('.ps_preview'), $ps_preview_wrapper = $tooltip.find('.ps_preview_wrapper'), $links = $ps_nav.children('li').not($tooltip), total_images = $links.length, currentHovered = -1, current = 0, $loader = $('#loader');(加载程序元素中没有提到的HTML结构,因为我们把它以外的容器。我们想要展示一个加载元素,直到所有的图片都加载。在下载文件中您将能够看到的图像的预加载功能)。 现在我们需要检查如果浏览器是一个真正的一个或任何疯狂的原因,一个蹩脚的,比方说,即:var ie = false; if ($.browser.msie) { ie = true; // oh no sweet Jesus } if(!ie) // there is a God $tooltip.css({ opacity : 0 }).show();基本上,我们想给预览元素或工具提示的不透明度0,动画1当我们上空盘旋。因为在IE中它不帮助简单地添加一个不透明过滤器(元素仍显示)我们想使用显示/隐藏,而不是动画的不透明度。所以,我们添加显示:类的风格,但没有拿出来,如果我们不使用IE。 预加载图片后,我们将显示容器:var loaded = 0; $links.each(function(i){ var $link = $(this); $link.find('a').preload({ onComplete : function(){ ++loaded; if(loaded == total_images){ //all images preloaded, //show ps_container and initialize events $loader.hide(); $ps_container.show(); //when mouse enters the the dots, //show the tooltip, //when mouse leaves hide the tooltip, //clicking on one will display the respective image $links.bind('mouseenter',showTooltip) .bind('mouseleave',hideTooltip) .bind('click',showImage); //navigate through the images $ps_next.bind('click',nextImage); $ps_prev.bind('click',prevImage); } } }); });showTooltip()函数将显示缩略图预览和动画到正确的位置。它还将幻灯片缩略图内,向右或向左,根据我们在哪里“coming from”:function showTooltip(){ var $link = $(this), idx = $link.index(), linkOuterWidth = $link.outerWidth(), //this holds the left value for the next position //of the tooltip left = parseFloat(idx * linkOuterWidth) - $tooltip.width()/2 + linkOuterWidth/2, //the thumb image source $thumb = $link.find('a').attr('rel'), imageLeft; //if we are not hovering the current one if(currentHovered != idx){ //check if we will animate left->right or right->left if(currentHovered != -1){ if(currentHovered < idx){ imageLeft = 75; } else{ imageLeft = -75; } } currentHovered = idx; //the next thumb image to be shown in the tooltip var $newImage = $('<img alt="">').css('left','0px') .attr('src',$thumb); //if theres more than 1 image //(if we would move the mouse too fast it would probably happen) //then remove the oldest one (:last) if($ps_preview_wrapper.children().length > 1) $ps_preview_wrapper.children(':last').remove(); //prepend the new image $ps_preview_wrapper.prepend($newImage); var $tooltip_imgs = $ps_preview_wrapper.children(), tooltip_imgs_count = $tooltip_imgs.length; //if theres 2 images on the tooltip //animate the current one out, and the new one in if(tooltip_imgs_count > 1){ $tooltip_imgs.eq(tooltip_imgs_count-1) .stop() .animate({ left:-imageLeft+'px' },150,function(){ //remove the old one $(this).remove(); }); $tooltip_imgs.eq(0) .css('left',imageLeft + 'px') .stop() .animate({ left:'0px' },150); } } //if we are not using a "browser", we just show the tooltip, //otherwise we fade it in // if(ie) $tooltip.css('left',left + 'px').show(); else $tooltip.stop() .animate({ left : left + 'px', opacity : 1 },150); }hideTooltip()函数简单地逐渐消失的缩略图预览(或隐藏,如果IE):function hideTooltip(){ //hide / fade out the tooltip if(ie) $tooltip.hide(); else $tooltip.stop() .animate({ opacity : 0 },150); }以下函数将显示全尺寸的图像和动画包装正确的大小。新形象将“slide into place”:function showImage(e){ var $link = $(this), idx = $link.index(), $image = $link.find('a').attr('href'), $currentImage = $ps_image_wrapper.find('img'), currentImageWidth = $currentImage.width(); //if we click the current one return if(current == idx) return false; //add class selected to the current page / dot $links.eq(current).removeClass('selected'); $link.addClass('selected'); //the new image element var $newImage = $('<img alt="">').css('left',currentImageWidth + 'px') .attr('src',$image); //if the wrapper has more than one image, remove oldest if($ps_image_wrapper.children().length > 1) $ps_image_wrapper.children(':last').remove(); //prepend the new image $ps_image_wrapper.prepend($newImage); //the new image width //this will be the new width of the ps_image_wrapper var newImageWidth = $newImage.width(); //check animation direction if(current > idx){ $newImage.css('left',-newImageWidth + 'px'); currentImageWidth = -newImageWidth; } current = idx; //animate the new width of the ps_image_wrapper //(same like new image width) $ps_image_wrapper.stop().animate({ width : newImageWidth + 'px' },350); //animate the new image in $newImage.stop().animate({ left : '0px' },350); //animate the old image out $currentImage.stop().animate({ left : -currentImageWidth + 'px' },350); e.preventDefault(); }导航功能只会触发单击事件点(我们已经照顾一开始):function nextImage(){ if(current < total_images){ $links.eq(current+1).trigger('click'); } } function prevImage(){ if(current > 0){ $links.eq(current-1).trigger('click'); } }这就是所有的!我们希望你喜欢甜缩略图教程,觉得它有用!